Thursday, June 25, 2015

Extreme Birthday Dessert

What's the best part about celebrating birthdays?  Having a good excuse to whip together an incredibly unhealthy (but extremely delicious) dessert that comes in at around 100,000 calories per serving.  This past year my family came up to Manhattan for a K-State football game the day before my birthday, so I had them over to my apartment after the game for my birthday celebration. As I may have mentioned previously, I feel that peanut butter and chocolate is the best combination ever invented, which is why I chose this Peanut Butter Chocolate Dessert to celebrate my 22nd year. Plus, I was able to put it all together before the game, stick it in the fridge, and come back to enjoy it after the Wildcats' victory.

Peanut Butter Chocolate Dessert

Ingredients

20 Oreos
2 Tbsp. margarine, softened
1 8-oz. package cream cheese, softened
1/2 cup creamy peanut butter
1 1/2 cups powdered sugar
1 16-oz. carton whipped topping, thawed
16 miniature Reese's peanut butter cups, chopped
1 cup cold milk
1 3.9-oz. package instant chocolate fudge pudding mix

Directions

1. Crush 16 Oreos; toss with margarine.  Press into a 9" square dish and set aside.
2. In a large bowl, beat the cream cheese, peanut butter, and 1 cup of powdered sugar until smooth.  Fold in half of the whipped topping.
3. Spread the cream mixture over the Oreo crust.  Sprinkle with chopped Reese's.
4. In another large bowl, beat the milk, pudding mix, and remaining 1/2 cup of powdered sugar on low speed for 2 minutes.  Let stand for 2 minutes or until soft-set.
5. Fold in the remaining half of whipped topping.  Spread pudding mixture over the peanut butter cup layer.  
6. Crush the 4 remaining Oreos and sprinkle over the top.  Cover and chill for at least 3 hours.
My Notes: I used a little more than the 1/2 cup of peanut butter to really bump up the peanut butter flavor.  Instead of miniature Reese's, I used 6 snack size Reese's cups for the filling and 4 additional snack size Reese's cups for the topping (along with 5 crushed Oreos). This recipe is from the Taste of Home website.

And here's a photo of my sister and me cheering on the 'Cats to victory over Texas Tech prior to my birthday celebration. We're smiling so big because we know that - win or lose - we will still have a delicious dessert waiting for us after the game!

Scrumptious Soups

The absolute best part of cooking in the winter?  Throwing together ingredients in the slow cooker, leaving them for a couple of hours, and coming back to a hot and delicious soup ready for the evening meal.  Though chili is one of my favorite meals, these two soups are also favorites of mine. (And yes, I'm wearing shorts in the Potato Sausage Soup photo - I might not have been able to wait until winter to make it...) 

Potato Sausage Soup

Ingredients

1 1/2 cups water
5 cups russet potatoes, peeled & cubed
2 onions, chopped
1/4 tsp. celery seed
1 tsp. salt
1 lb. pork sausage, browned, drained, & sliced
1 quart milk
3 Tbsp. parsley
1 can cheddar cheese soup

Directions

1. Combine potatoes, water, onions, celery seed, and salt in a large saucepan.  Bring to a boil and then simmer until potatoes are cooked through.
2. Combine potatoes and all remaining ingredients in a crock pot.
3. Heat for 2-3 hours or until heated through.
My Notes: This recipe comes from my Grandma Claassen.  If you do not have a crock pot, it can be prepared on the stove by adding all of the ingredients to the potato and water mixture.  Heat on the stove top until the cheese soup is melted and incorporated. I use only about 1/4 cup of onion.

Santa Fe Chicken Soup

Ingredients

2 13-oz. cans of shredded chicken or about 4 cooked & chopped chicken breasts
1 small onion, diced
15.25-oz. can whole kernel corn, undrained
16 oz. can pinto beans, undrained
14.5 oz. can diced tomatoes, undrained
10 oz. can Rotel tomatoes, undrained
1 lb. Velveeta cheese, cubed
1/4 cup milk

Directions

1. Combine all ingredients in the slow cooker.
2. Cover and cook on low for 3-4 hours, or until cheese is melted. Try not to let the soup boil.
My Notes: Serving this soup with tortilla chips crumbled on top adds a nice crunch.

Wednesday, June 24, 2015

Canned Biscuits & One More Apple Post...

When cooking for myself, I make a lot of half or quarter recipes so that I'm not eating one dish for an entire week.  When I only used half of a can of biscuits to make one of my favorite recipes that my mom always prepared, I decided to make a delicious dessert to complete the meal so that the biscuit dough wouldn't go to waste! These very different recipes show how versatile canned dough can be.


Pizza Cups

Ingredients

3/4 lb. ground beef, browned & drained
1 6-oz. can tomato paste
1 Tbsp. onion, minced
1 tsp. Italian seasoning
1/2 tsp. salt
1 10-oz. can refrigerated biscuits
3/4 cup mozzarella cheese, shredded

Directions

1. Combine the ground beef, tomato paste, onion, Italian seasoning, and salt in a skillet. Cook over low heat for 5 minutes.
2. Place biscuits in a greased muffin tin, pressing to cover bottom and sides.  
3. Spoon about 1/4 cup of beef mixture into each biscuit cup. Sprinkle with cheese.
4. Bake at 400 degrees for 12 minutes or until golden brown. Makes 10 pizza cups.
My Notes: I do not typically use the onion in my pizza cups.  Be sure to buy a small size of biscuits (I usually get the Pillsbury Grands, Jr. size - not the large Grands biscuits) - otherwise you will have a large biscuit to meat ratio.

I have one final apple recipe to add to my last post, if those recipes don't use up the fall apple supply.  I greatly enjoy watching Food Network and saw this mouth-watering recipe one Saturday morning as I was stretching in front of the TV after my morning run.  The recipe is from the show Trisha's Southern Kitchen (which is currently my second favorite Food Network show - behind the Pioneer Woman, of course).


Apple Dumplings

Ingredients

2 apples
Juice of 1 lemon
1 cup granulated sugar
1/2 cup margarine
1/4 tsp. vanilla extract
8 canned buttermilk biscuits
4 tsp. cinnamon

Directions

1. Peel, core, and sliced the apples into 8 slices each.  Place in bowl of lemon juice and water to slow browning.
2. In a medium saucepan, combine 1 cup of water, 3/4 cup granulated sugar, margarine, and vanilla.  Bring the sugar mixture to a boil over medium heat.
3. Separate each piece of biscuit dough into two halves.  Wrap the biscuit half around an apple slice and seal the edges.
4. Place the biscuit-covered apple slices in a 9"x12" casserole dish.  Pour the sugar mixture over top.
5. Combine the remaining 1/4 cup sugar and cinnamon.  Sprinkle over top.
6. Bake at 375 degrees for about 35 minutes or until golden brown.
My Notes: The original recipe can be found here: http://www.foodnetwork.com/recipes/trisha-yearwood/apple-dumplings-recipe.html

Sunday, March 29, 2015

Apples, Apples, Apples!!!

Every fall my mom makes a trip  to the local apple orchard (ok, so it's not much of a trip, since it's only about 3 miles from our house...) and buys a giant bag of delicious apples.  I love to eat apples all year round, but the grocery store does not offer anything as delicious as the apples grown just down the road.  Since all of her kids are off at college now, mom and dad can't handle that giant bag of apples on their own, so she usually sends some my way.  Apples are delicious by themselves, but baking with them adds delightful variety.  Here are a few of the recipes I made last fall with my apple supply.


Incredibly Moist Apple Bread

Ingredients

1 cup granulated sugar
1/2 cup shortening
2 eggs
1 tsp. vanilla extract
2 cups flour
1 tsp.  baking powder
1 tsp. baking soda
1/2 tsp. salt
2 cups apples, chopped & pared
1/2 cup nuts, chopped
1 Tbsp. granulated sugar
1/4 tsp. cinnamon

Directions

1. Heat oven to 350 degrees and grease a 9"x5" loaf pan.
2. Cream together the 1 cup sugar, shortening, eggs, and vanilla.  
3. Stir in flour, baking powder, baking soda, and salt until smooth.
4. Stir in apples and nuts; spread in loaf pan.
5. Mix the 1 Tbsp. sugar and cinnamon; sprinkle evenly over batter.
6. Bake until toothpick inserted in center comes out clean, about 50-60 minutes.
7. Immediately remove from pan; cool bread completely before slicing.
My Notes: This recipe was from the food.com website (contributor: *PENNY*).  I had some issues with the bottom of the bread sticking to the loaf pan, so make sure the pan is well-greased.  I used about 2.5 large apples in my recipe and omitted the nuts (I'm not a big nuts-in-bread fan...). I  baked the loaf for about 55 minutes. In the future, I might add some cinnamon into the batter for that extra kick of flavor.


Apple Peanut Butter Cookies

Ingredients

1/2 cup shortening
1/2 cup chunky peanut butter
1/2 cup granulated sugar
1/2 cup packed brown sugar
1 egg
1 1/2 tsp. vanilla extract
1 1/2 cups all-purpose flour
1/2 tsp. baking soda
1/2 tsp. salt
1/2 tsp. cinnamon
1/2 cup grated peeled apple

Directions

1. In a large bowl, cream the shortening, peanut butter, and sugar until light and fluffy.  Beat in egg and vanilla.
2. Combine flour, baking soda, salt, and cinnamon.  Gradually add to creamed mixture and mix well.  Stir in apple.
3. Drop dough by rounded tablespoonfuls on  greased baking sheets.
4. Bake at 375 degrees for 10-12 minutes or until golden brown.  Cool for 5 minutes before removing to wire racks.
My Notes: This recipe is from the lovely Taste of Home website.  It made about 30 small cookies.  I added slightly more cinnamon than the recipe called for and used 1 large apple.  I actually finely chopped my apple instead of grating it (because I am a poor college student with limited kitchen supplies that did not include a grater at the time...). When forming the cookies, the dough was fairly dry, so I pressed the dough into balls to keep it together and baked the cookies for around 8 minutes.

I have one more apple recipe coming, but you'll just have to be satisfied with these until the next post!

Saturday, March 7, 2015

Best Casserole Ever

So, a few posts ago I posted recipes for some classic Mennonite foods.  Though delicious, making the traditional recipes can sometimes take more time and effort than the average person has to put into an evening meal.  That's where casseroles come into the picture.  One of my favorite meals ever is Verenike Casserole - the casserole version of cottage cheese dumplings with ham and cream gravy.  These are also excellent with some fresh zwieback on the side - there's no substitute for those!


Verenike Casserole

Ingredients

10 oz. wide egg noodles, cooked & drained
12 oz. cottage cheese
2 eggs
1 tsp. salt
1 tsp. pepper
1 cup sour cream
2 Tbsp. flour
1 1/2 Tbsp. shortening
1 1/2 cups half-and-half
1 cup ham, browned & cubed

Directions

1. Spread noddles in a 9"x13" glass baking dish.
2. Combine cottage cheese, eggs, salt, and pepper. Spread over noodles.
3. Spread sour cream over the cottage cheese layer.
4. Whisk together flour, shortening, and half-and-half in a skillet until thickened.
5. Add ham.  Pour over casserole.
6. Bake for 40 minutes at 350 degrees.
My Notes: When I'm making this casserole for myself, I sub in chopped deli ham (which I already have on hand) for the ham cubes - as seen in the photo. This casserole also freezes well.

Sunday, March 1, 2015

Bridal Shower Goodies, Part 2

Well, since I covered the "healthy" (or not so much...) portion of our bridal shower treats in my last post, it's now time to move on to the real gems: DESSERT!  I am a huge fan of cheesecake - any flavor, any topping (except coconut), & any size.  I asked for a springform pan for my birthday one year in high school and have provided my family with delicious cheesecakes periodically ever since.  As the bridal shower approached, I knew that Courtney enjoys a good cheesecake as well, so I was able to convince my mom to let me make a variety of mini cheesecakes for the bridal shower.  I searched the wonderful resource that is Pinterest and painstakingly narrowed down my options to four recipes. Cheesecakes made in cupcake tins are the perfect portion size - plus, they're small enough that if you want to sample two flavors, you can have both.  As they teach us in my nutrition classes - everything in moderation!
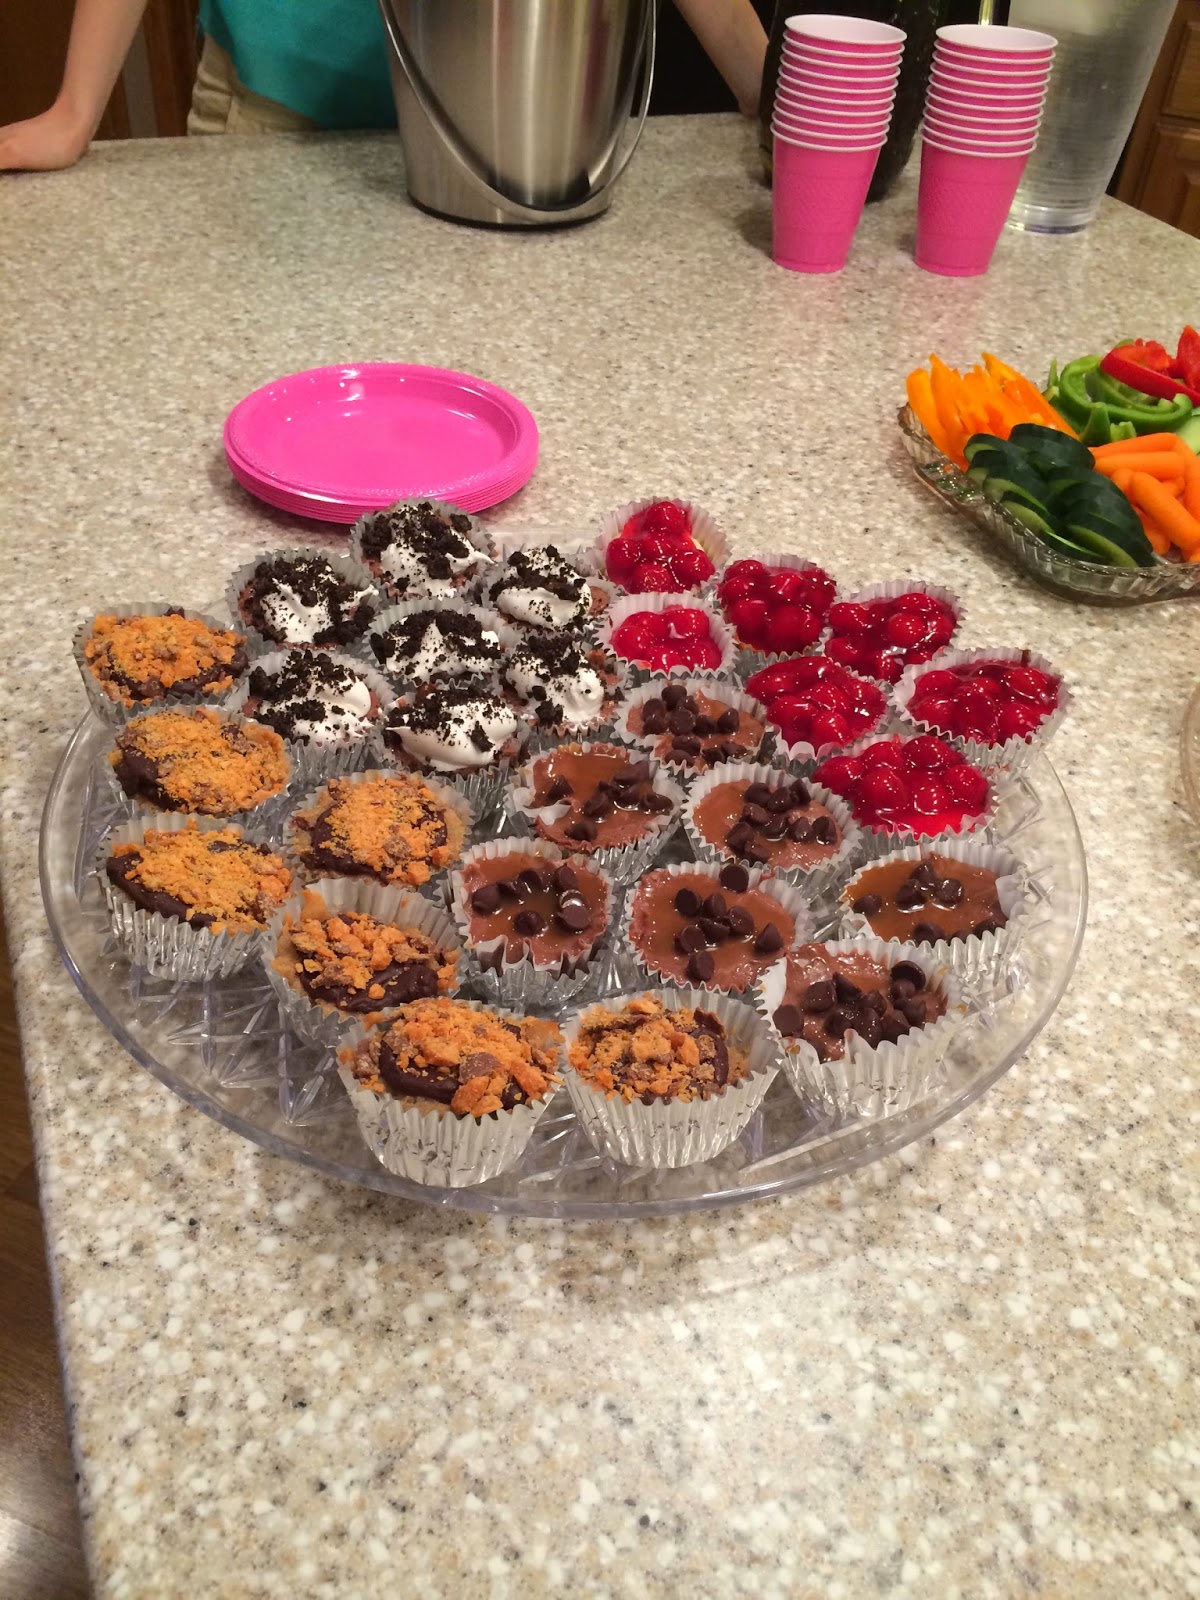
Clockwise from the top right: Classic Mini Cheesecakes,
Chocolate Caramel Mini Cheesecakes, Peanut Butter
Finger Mini Cheesecakes, & Nutella Cheesecake Cupcakes

Classic Mini Cheesecakes

Ingredients

1 cup graham cracker crumbs
3 Tbsps. butter, melted
8 oz. cream cheese, softened
1/3 cup granulated sugar
1 tsp. vanilla extract
1 egg, lightly beaten
1 can cherry pie filling

Directions

1. In a small bowl, combine graham cracker crumbs and butter. Press gently into the bottom of 12 paper-lined muffin cups. 
2. In another bowl, beat cream cheese, sugar, and vanilla until smooth. Add egg; beat on low speed until combined.  Spoon into crusts.
3. Bake at 350 degrees for 15-16 minutes or until centers are set.  Cool for 10 minutes before removing from pan to wire rack to cool completely. Refrigerate.
4. Before serving, top each cheesecake with a spoonful of pie filling (about 4-5 cherries per cheesecake).
My Notes: This recipe is from the Taste of Home website as Jam-Topped Mini Cheesecakes.  I decided to go with the pie filling for the topping in order to create the classic cheesecake with cherry topping.  Leaving the cheesecakes in the liner helps to contain the filling a bit while it is sitting on the serving platter.

Chocolate Caramel Mini Cheesecakes

Ingredients

3/4 cup graham cracker crumbs
2 Tbsp. granulated sugar
2 Tbsp. butter, melted
12 oz. cream cheese, softened
1 1/4 cups milk chocolate chips, divided
2/3 cup sweetened condensed milk
2 Tbsp. caramel ice cream topping + additional for topping
1 egg
3 Tbsp. unsweetened baking cocoa
1 tsp. vanilla extract

Directions

1. In a small bowl, combine graham cracker crumbs, sugar, and butter.  Press 1 Tbsp. of the crust mixture into 12 paper-lined muffin cups.  Sprinkle a few chocolate chips over the graham cracker crust.
2. In a medium bowl, beat cream cheese until creamy.  Add sweetened condensed milk, caramel topping, egg, baking cocoa, and vanilla.  Beat until well combined.
3. Pour 1/4 cup of batter into each muffin cup.
4. Bake at 300 degrees for 18-20 minutes.  Remove from oven and allow to cool for 10 minutes.
5. Sprinkle remaining chocolate chips over the cheesecakes.  Allow to cool completely.
6. Refrigerate.  Serve with additional caramel topping drizzled over the cheesecakes.
My Notes: These were very rich and chocolate-y.  The caramel over the top turned into more of a "puddle" than a "drizzle", so make sure not to go overboard if that's something you don't want.  This recipe is from the blog "Mostly Homemade Mom."

Peanut Butter Finger Mini Cheesecakes

Ingredients

1 cup vanilla wafer crumbs
2 Tbsp. + 1/2 cup granulated sugar
2 Tbsp. butter, melted
1/4 tsp. salt, divided
8 oz. cream cheese, softened
1/4 cup creamy peanut butter
1 egg
4-5 Tbsp. heavy cream, divided
6 Fun Size Butterfinger candy bars, crushed
1 cup semi-sweet chocolate chips

Directions

1. Mix together vanilla wafer crumbs, 2 Tbsp. sugar, butter, and 1/8 tsp. salt. Press into the bottom of paper-lined muffin tins. Bake for 10 minutes at 350 degrees. 
2. Beat together cream cheese and peanut butter until smooth. Add in 1/2 cup sugar, egg, 2 Tbsp. cream, and 1/8 tsp. salt.  Stir in four of the crushed Butterfinger candy bars.
3. Pour over prepared crusts.  Bake at 300 degrees for 20-22 minutes or until cheesecake is set. Let cool and remove from pans.
4. For the topping, melt the chocolate chips in the microwave until smooth.  Stir in 2-3 Tbsp. of heavy cream. Spoon over the top of the cooled cheesecakes and sprinkle with remaining 2 Butterfinger candy bars.  
My Notes: This recipe was found on the "Picky Palate" blog. After refrigeration, the chocolate topping hardened quite a bit, but it was still edible and delicious.

Nutella Cheesecake Cupcakes

Ingredients

12 Oreos, finely crushed + additional for topping
1 1/2 Tbsp. butter, melted
6 Tbsp. granulated sugar
1 1/2 Tbsp. all-purpose flour
12 oz. cream cheese, softened
2 eggs
1/4 cup milk
1/4 cup sour cream
1/2 tsp. vanilla extract
1/2 cup Nutella
Cool Whip topping

Directions

1. Mix together Oreos and butter. Press 1 Tbsp. of crust mixture into the bottom of 12 paper-lined muffin tins. Bake at 325 degrees for 5 minutes.  Allow to cool.
2. Blend together sugar, flour, and cream cheese until smooth.  Blend in eggs.  Add in milk, sour cream, and vanilla until combined.  Mix in Nutella.
3. Divide the mixture between the muffin tins, pouring about 1/4 cup of batter into each.  Bake at 325 for 20-24 minutes or until set.  Allow to cool and refrigerate.
4. Before serving, dollop whipped topping on each cheesecake and sprinkle with excess Oreo crumbs. 
My Notes: This was probably my favorite recipe of the four.  The original recipe recommends topping the cheesecakes with hazelnuts or shaved chocolate, which would also be delicious.  This recipe was found on the "Cooking Classy" blog.

Saturday, February 28, 2015

Bridal Shower Goodies, Part 1

I am always up for a good party - because good parties mean good food!  Last summer, my lovely cousin Courtney got married, and we had the honor of hosting a family bridal shower for her prior to the wedding.  Though the desserts were the main star of the show, we had some snack foods for a light meal, as well.  Since Courtney is a self-proclaimed frequent spill-er, we decided to choose foods that were especially hard on her - dips!  We served queso, Chalupa Dip, fresh veggies with Ranch dip, and Frozen Fruit Salad. Chalupa Dip is a layered dip that my mom often brings to our family Christmas for snacking, and the platter is almost always scraped clean.  Frozen Fruit Salad is also made for holidays occasionally, although the storage and transportation of the fruit cups is a bit more difficult.  Portioning the salad into individual plastic cups makes them easy for guests to pick up and carry - and it also prevents the problem of fruit salad juice running all over your plate.


Chalupa Dip

Ingredients

16 oz. can refried beans
9 oz. can bean dip
8 oz. sour cream
2 Tbsp. mayonnaise
3 Tbsp. Picante sauce
10 oz. cheddar cheese, shredded
1 tomato, diced
1 head lettuce, shredded
2 green onions, chopped
Tortilla chips for serving

Directions

1. Mix refried beans and bean dip; spread on large round serving platter.
2. Mix sour cream, mayo, and Picante sauce; spread over bean layer.
3. Sprinkle on half of grated cheese, followed by lettuce, onion, and tomatoes. Top with the remaining cheese.
My Notes: The platter that we usually use for this dip is about 15" diameter.  With all of the toppings, it is usually piled very high on the platter, so you may have to slightly press the lettuce into the sour cream layer for it adhere well.


Frozen Fruit Salad

Ingredients

3/4 cup (6 oz.) frozen lemonade concentrate
3/4 cup (6 oz.) frozen orange juice concentrate
15 oz. can crushed pineapple
2 1/4 cups water
3/4 cup granulated sugar
1 1/4 cup (10 oz.) frozen or fresh sliced strawberries
4 bananas, sliced

Directions

1. Mix all ingredients together in a large bowl.
2. Use a ladle to portion into individual serving containers.  Freeze.
3. Remove from freezer about 30 minutes before serving.
My Notes: We typically serve this in 6 oz. clear plastic cups.  However, if you have leftover salad after portioning into the cups you need or do not have freezer space for storing small cups, you can freeze it in a larger serving container and scoop out your own portions. This recipe makes about 12 servings.