Thursday, June 25, 2015

Extreme Birthday Dessert

What's the best part about celebrating birthdays?  Having a good excuse to whip together an incredibly unhealthy (but extremely delicious) dessert that comes in at around 100,000 calories per serving.  This past year my family came up to Manhattan for a K-State football game the day before my birthday, so I had them over to my apartment after the game for my birthday celebration. As I may have mentioned previously, I feel that peanut butter and chocolate is the best combination ever invented, which is why I chose this Peanut Butter Chocolate Dessert to celebrate my 22nd year. Plus, I was able to put it all together before the game, stick it in the fridge, and come back to enjoy it after the Wildcats' victory.

Peanut Butter Chocolate Dessert

Ingredients

20 Oreos
2 Tbsp. margarine, softened
1 8-oz. package cream cheese, softened
1/2 cup creamy peanut butter
1 1/2 cups powdered sugar
1 16-oz. carton whipped topping, thawed
16 miniature Reese's peanut butter cups, chopped
1 cup cold milk
1 3.9-oz. package instant chocolate fudge pudding mix

Directions

1. Crush 16 Oreos; toss with margarine.  Press into a 9" square dish and set aside.
2. In a large bowl, beat the cream cheese, peanut butter, and 1 cup of powdered sugar until smooth.  Fold in half of the whipped topping.
3. Spread the cream mixture over the Oreo crust.  Sprinkle with chopped Reese's.
4. In another large bowl, beat the milk, pudding mix, and remaining 1/2 cup of powdered sugar on low speed for 2 minutes.  Let stand for 2 minutes or until soft-set.
5. Fold in the remaining half of whipped topping.  Spread pudding mixture over the peanut butter cup layer.  
6. Crush the 4 remaining Oreos and sprinkle over the top.  Cover and chill for at least 3 hours.
My Notes: I used a little more than the 1/2 cup of peanut butter to really bump up the peanut butter flavor.  Instead of miniature Reese's, I used 6 snack size Reese's cups for the filling and 4 additional snack size Reese's cups for the topping (along with 5 crushed Oreos). This recipe is from the Taste of Home website.

And here's a photo of my sister and me cheering on the 'Cats to victory over Texas Tech prior to my birthday celebration. We're smiling so big because we know that - win or lose - we will still have a delicious dessert waiting for us after the game!

Scrumptious Soups

The absolute best part of cooking in the winter?  Throwing together ingredients in the slow cooker, leaving them for a couple of hours, and coming back to a hot and delicious soup ready for the evening meal.  Though chili is one of my favorite meals, these two soups are also favorites of mine. (And yes, I'm wearing shorts in the Potato Sausage Soup photo - I might not have been able to wait until winter to make it...) 

Potato Sausage Soup

Ingredients

1 1/2 cups water
5 cups russet potatoes, peeled & cubed
2 onions, chopped
1/4 tsp. celery seed
1 tsp. salt
1 lb. pork sausage, browned, drained, & sliced
1 quart milk
3 Tbsp. parsley
1 can cheddar cheese soup

Directions

1. Combine potatoes, water, onions, celery seed, and salt in a large saucepan.  Bring to a boil and then simmer until potatoes are cooked through.
2. Combine potatoes and all remaining ingredients in a crock pot.
3. Heat for 2-3 hours or until heated through.
My Notes: This recipe comes from my Grandma Claassen.  If you do not have a crock pot, it can be prepared on the stove by adding all of the ingredients to the potato and water mixture.  Heat on the stove top until the cheese soup is melted and incorporated. I use only about 1/4 cup of onion.

Santa Fe Chicken Soup

Ingredients

2 13-oz. cans of shredded chicken or about 4 cooked & chopped chicken breasts
1 small onion, diced
15.25-oz. can whole kernel corn, undrained
16 oz. can pinto beans, undrained
14.5 oz. can diced tomatoes, undrained
10 oz. can Rotel tomatoes, undrained
1 lb. Velveeta cheese, cubed
1/4 cup milk

Directions

1. Combine all ingredients in the slow cooker.
2. Cover and cook on low for 3-4 hours, or until cheese is melted. Try not to let the soup boil.
My Notes: Serving this soup with tortilla chips crumbled on top adds a nice crunch.

Wednesday, June 24, 2015

Canned Biscuits & One More Apple Post...

When cooking for myself, I make a lot of half or quarter recipes so that I'm not eating one dish for an entire week.  When I only used half of a can of biscuits to make one of my favorite recipes that my mom always prepared, I decided to make a delicious dessert to complete the meal so that the biscuit dough wouldn't go to waste! These very different recipes show how versatile canned dough can be.


Pizza Cups

Ingredients

3/4 lb. ground beef, browned & drained
1 6-oz. can tomato paste
1 Tbsp. onion, minced
1 tsp. Italian seasoning
1/2 tsp. salt
1 10-oz. can refrigerated biscuits
3/4 cup mozzarella cheese, shredded

Directions

1. Combine the ground beef, tomato paste, onion, Italian seasoning, and salt in a skillet. Cook over low heat for 5 minutes.
2. Place biscuits in a greased muffin tin, pressing to cover bottom and sides.  
3. Spoon about 1/4 cup of beef mixture into each biscuit cup. Sprinkle with cheese.
4. Bake at 400 degrees for 12 minutes or until golden brown. Makes 10 pizza cups.
My Notes: I do not typically use the onion in my pizza cups.  Be sure to buy a small size of biscuits (I usually get the Pillsbury Grands, Jr. size - not the large Grands biscuits) - otherwise you will have a large biscuit to meat ratio.

I have one final apple recipe to add to my last post, if those recipes don't use up the fall apple supply.  I greatly enjoy watching Food Network and saw this mouth-watering recipe one Saturday morning as I was stretching in front of the TV after my morning run.  The recipe is from the show Trisha's Southern Kitchen (which is currently my second favorite Food Network show - behind the Pioneer Woman, of course).


Apple Dumplings

Ingredients

2 apples
Juice of 1 lemon
1 cup granulated sugar
1/2 cup margarine
1/4 tsp. vanilla extract
8 canned buttermilk biscuits
4 tsp. cinnamon

Directions

1. Peel, core, and sliced the apples into 8 slices each.  Place in bowl of lemon juice and water to slow browning.
2. In a medium saucepan, combine 1 cup of water, 3/4 cup granulated sugar, margarine, and vanilla.  Bring the sugar mixture to a boil over medium heat.
3. Separate each piece of biscuit dough into two halves.  Wrap the biscuit half around an apple slice and seal the edges.
4. Place the biscuit-covered apple slices in a 9"x12" casserole dish.  Pour the sugar mixture over top.
5. Combine the remaining 1/4 cup sugar and cinnamon.  Sprinkle over top.
6. Bake at 375 degrees for about 35 minutes or until golden brown.
My Notes: The original recipe can be found here: http://www.foodnetwork.com/recipes/trisha-yearwood/apple-dumplings-recipe.html

Sunday, March 29, 2015

Apples, Apples, Apples!!!

Every fall my mom makes a trip  to the local apple orchard (ok, so it's not much of a trip, since it's only about 3 miles from our house...) and buys a giant bag of delicious apples.  I love to eat apples all year round, but the grocery store does not offer anything as delicious as the apples grown just down the road.  Since all of her kids are off at college now, mom and dad can't handle that giant bag of apples on their own, so she usually sends some my way.  Apples are delicious by themselves, but baking with them adds delightful variety.  Here are a few of the recipes I made last fall with my apple supply.


Incredibly Moist Apple Bread

Ingredients

1 cup granulated sugar
1/2 cup shortening
2 eggs
1 tsp. vanilla extract
2 cups flour
1 tsp.  baking powder
1 tsp. baking soda
1/2 tsp. salt
2 cups apples, chopped & pared
1/2 cup nuts, chopped
1 Tbsp. granulated sugar
1/4 tsp. cinnamon

Directions

1. Heat oven to 350 degrees and grease a 9"x5" loaf pan.
2. Cream together the 1 cup sugar, shortening, eggs, and vanilla.  
3. Stir in flour, baking powder, baking soda, and salt until smooth.
4. Stir in apples and nuts; spread in loaf pan.
5. Mix the 1 Tbsp. sugar and cinnamon; sprinkle evenly over batter.
6. Bake until toothpick inserted in center comes out clean, about 50-60 minutes.
7. Immediately remove from pan; cool bread completely before slicing.
My Notes: This recipe was from the food.com website (contributor: *PENNY*).  I had some issues with the bottom of the bread sticking to the loaf pan, so make sure the pan is well-greased.  I used about 2.5 large apples in my recipe and omitted the nuts (I'm not a big nuts-in-bread fan...). I  baked the loaf for about 55 minutes. In the future, I might add some cinnamon into the batter for that extra kick of flavor.


Apple Peanut Butter Cookies

Ingredients

1/2 cup shortening
1/2 cup chunky peanut butter
1/2 cup granulated sugar
1/2 cup packed brown sugar
1 egg
1 1/2 tsp. vanilla extract
1 1/2 cups all-purpose flour
1/2 tsp. baking soda
1/2 tsp. salt
1/2 tsp. cinnamon
1/2 cup grated peeled apple

Directions

1. In a large bowl, cream the shortening, peanut butter, and sugar until light and fluffy.  Beat in egg and vanilla.
2. Combine flour, baking soda, salt, and cinnamon.  Gradually add to creamed mixture and mix well.  Stir in apple.
3. Drop dough by rounded tablespoonfuls on  greased baking sheets.
4. Bake at 375 degrees for 10-12 minutes or until golden brown.  Cool for 5 minutes before removing to wire racks.
My Notes: This recipe is from the lovely Taste of Home website.  It made about 30 small cookies.  I added slightly more cinnamon than the recipe called for and used 1 large apple.  I actually finely chopped my apple instead of grating it (because I am a poor college student with limited kitchen supplies that did not include a grater at the time...). When forming the cookies, the dough was fairly dry, so I pressed the dough into balls to keep it together and baked the cookies for around 8 minutes.

I have one more apple recipe coming, but you'll just have to be satisfied with these until the next post!

Saturday, March 7, 2015

Best Casserole Ever

So, a few posts ago I posted recipes for some classic Mennonite foods.  Though delicious, making the traditional recipes can sometimes take more time and effort than the average person has to put into an evening meal.  That's where casseroles come into the picture.  One of my favorite meals ever is Verenike Casserole - the casserole version of cottage cheese dumplings with ham and cream gravy.  These are also excellent with some fresh zwieback on the side - there's no substitute for those!


Verenike Casserole

Ingredients

10 oz. wide egg noodles, cooked & drained
12 oz. cottage cheese
2 eggs
1 tsp. salt
1 tsp. pepper
1 cup sour cream
2 Tbsp. flour
1 1/2 Tbsp. shortening
1 1/2 cups half-and-half
1 cup ham, browned & cubed

Directions

1. Spread noddles in a 9"x13" glass baking dish.
2. Combine cottage cheese, eggs, salt, and pepper. Spread over noodles.
3. Spread sour cream over the cottage cheese layer.
4. Whisk together flour, shortening, and half-and-half in a skillet until thickened.
5. Add ham.  Pour over casserole.
6. Bake for 40 minutes at 350 degrees.
My Notes: When I'm making this casserole for myself, I sub in chopped deli ham (which I already have on hand) for the ham cubes - as seen in the photo. This casserole also freezes well.

Sunday, March 1, 2015

Bridal Shower Goodies, Part 2

Well, since I covered the "healthy" (or not so much...) portion of our bridal shower treats in my last post, it's now time to move on to the real gems: DESSERT!  I am a huge fan of cheesecake - any flavor, any topping (except coconut), & any size.  I asked for a springform pan for my birthday one year in high school and have provided my family with delicious cheesecakes periodically ever since.  As the bridal shower approached, I knew that Courtney enjoys a good cheesecake as well, so I was able to convince my mom to let me make a variety of mini cheesecakes for the bridal shower.  I searched the wonderful resource that is Pinterest and painstakingly narrowed down my options to four recipes. Cheesecakes made in cupcake tins are the perfect portion size - plus, they're small enough that if you want to sample two flavors, you can have both.  As they teach us in my nutrition classes - everything in moderation!

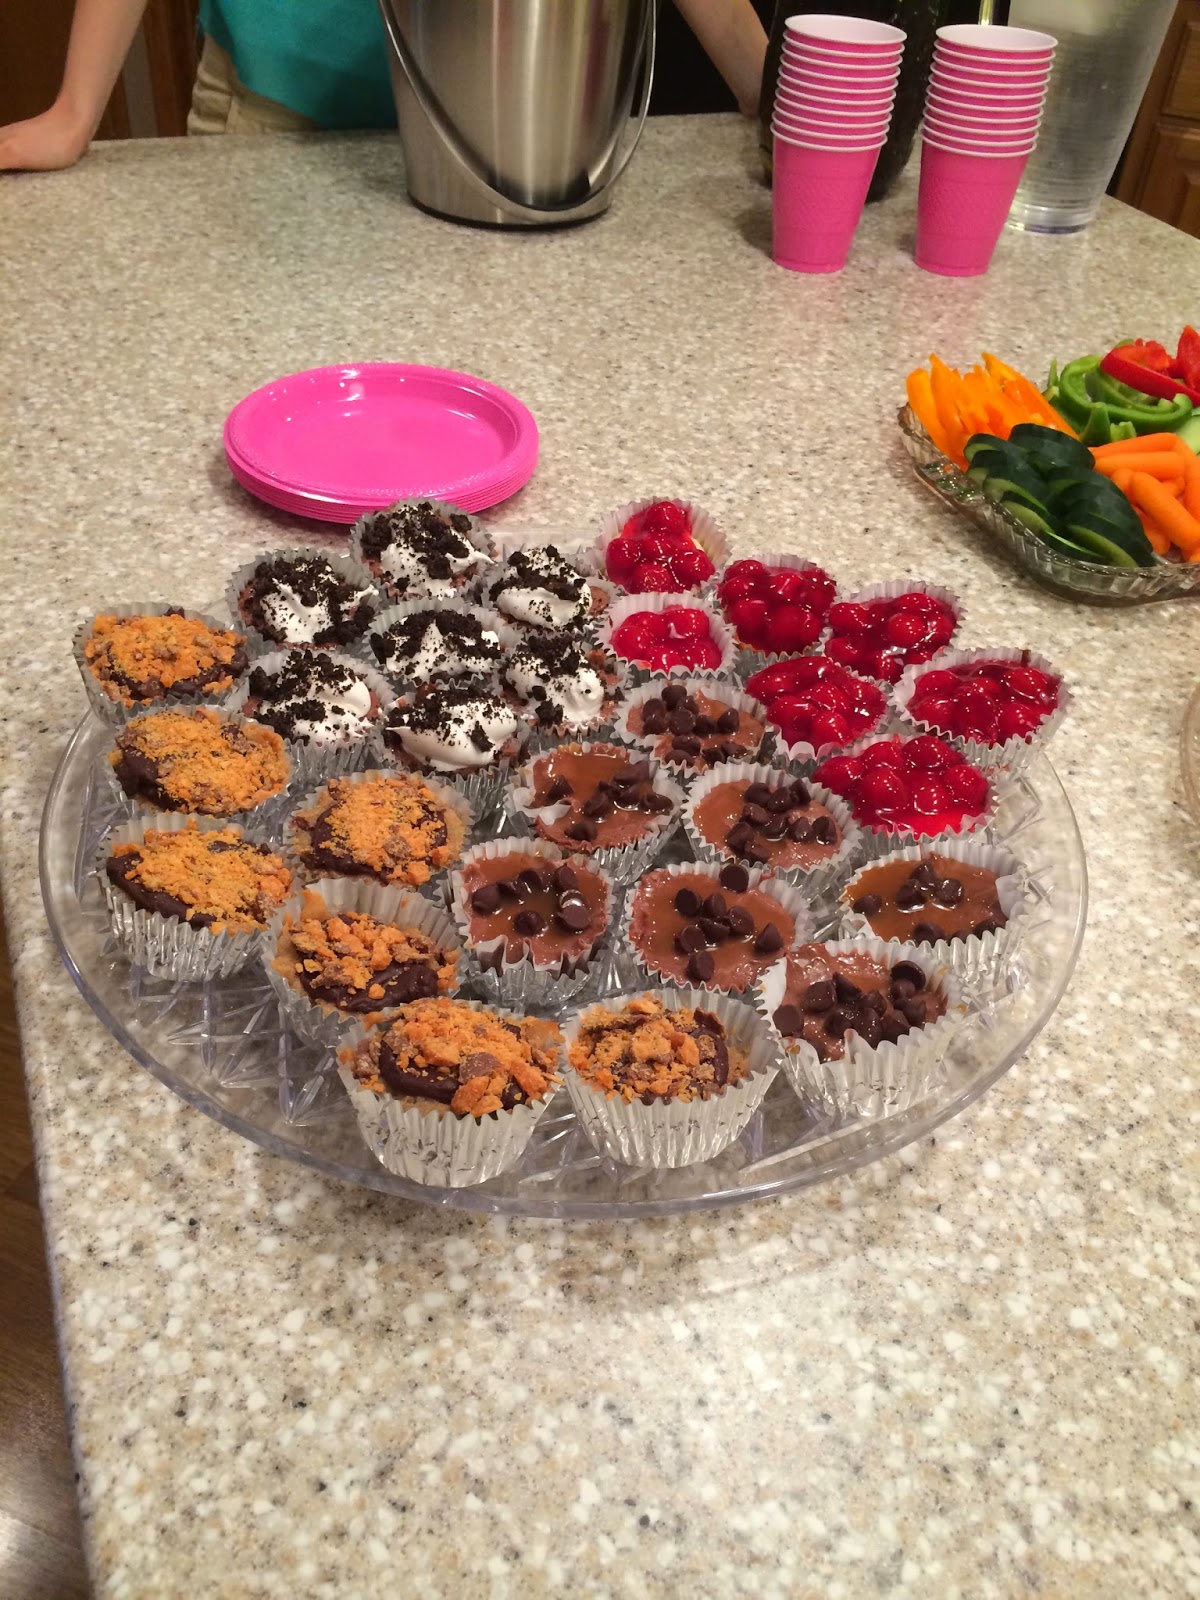
Clockwise from the top right: Classic Mini Cheesecakes,
Chocolate Caramel Mini Cheesecakes, Peanut Butter
Finger Mini Cheesecakes, & Nutella Cheesecake Cupcakes

Classic Mini Cheesecakes

Ingredients

1 cup graham cracker crumbs
3 Tbsps. butter, melted
8 oz. cream cheese, softened
1/3 cup granulated sugar
1 tsp. vanilla extract
1 egg, lightly beaten
1 can cherry pie filling

Directions

1. In a small bowl, combine graham cracker crumbs and butter. Press gently into the bottom of 12 paper-lined muffin cups. 
2. In another bowl, beat cream cheese, sugar, and vanilla until smooth. Add egg; beat on low speed until combined.  Spoon into crusts.
3. Bake at 350 degrees for 15-16 minutes or until centers are set.  Cool for 10 minutes before removing from pan to wire rack to cool completely. Refrigerate.
4. Before serving, top each cheesecake with a spoonful of pie filling (about 4-5 cherries per cheesecake).
My Notes: This recipe is from the Taste of Home website as Jam-Topped Mini Cheesecakes.  I decided to go with the pie filling for the topping in order to create the classic cheesecake with cherry topping.  Leaving the cheesecakes in the liner helps to contain the filling a bit while it is sitting on the serving platter.

Chocolate Caramel Mini Cheesecakes

Ingredients

3/4 cup graham cracker crumbs
2 Tbsp. granulated sugar
2 Tbsp. butter, melted
12 oz. cream cheese, softened
1 1/4 cups milk chocolate chips, divided
2/3 cup sweetened condensed milk
2 Tbsp. caramel ice cream topping + additional for topping
1 egg
3 Tbsp. unsweetened baking cocoa
1 tsp. vanilla extract

Directions

1. In a small bowl, combine graham cracker crumbs, sugar, and butter.  Press 1 Tbsp. of the crust mixture into 12 paper-lined muffin cups.  Sprinkle a few chocolate chips over the graham cracker crust.
2. In a medium bowl, beat cream cheese until creamy.  Add sweetened condensed milk, caramel topping, egg, baking cocoa, and vanilla.  Beat until well combined.
3. Pour 1/4 cup of batter into each muffin cup.
4. Bake at 300 degrees for 18-20 minutes.  Remove from oven and allow to cool for 10 minutes.
5. Sprinkle remaining chocolate chips over the cheesecakes.  Allow to cool completely.
6. Refrigerate.  Serve with additional caramel topping drizzled over the cheesecakes.
My Notes: These were very rich and chocolate-y.  The caramel over the top turned into more of a "puddle" than a "drizzle", so make sure not to go overboard if that's something you don't want.  This recipe is from the blog "Mostly Homemade Mom."

Peanut Butter Finger Mini Cheesecakes

Ingredients

1 cup vanilla wafer crumbs
2 Tbsp. + 1/2 cup granulated sugar
2 Tbsp. butter, melted
1/4 tsp. salt, divided
8 oz. cream cheese, softened
1/4 cup creamy peanut butter
1 egg
4-5 Tbsp. heavy cream, divided
6 Fun Size Butterfinger candy bars, crushed
1 cup semi-sweet chocolate chips

Directions

1. Mix together vanilla wafer crumbs, 2 Tbsp. sugar, butter, and 1/8 tsp. salt. Press into the bottom of paper-lined muffin tins. Bake for 10 minutes at 350 degrees. 
2. Beat together cream cheese and peanut butter until smooth. Add in 1/2 cup sugar, egg, 2 Tbsp. cream, and 1/8 tsp. salt.  Stir in four of the crushed Butterfinger candy bars.
3. Pour over prepared crusts.  Bake at 300 degrees for 20-22 minutes or until cheesecake is set. Let cool and remove from pans.
4. For the topping, melt the chocolate chips in the microwave until smooth.  Stir in 2-3 Tbsp. of heavy cream. Spoon over the top of the cooled cheesecakes and sprinkle with remaining 2 Butterfinger candy bars.  
My Notes: This recipe was found on the "Picky Palate" blog. After refrigeration, the chocolate topping hardened quite a bit, but it was still edible and delicious.

Nutella Cheesecake Cupcakes

Ingredients

12 Oreos, finely crushed + additional for topping
1 1/2 Tbsp. butter, melted
6 Tbsp. granulated sugar
1 1/2 Tbsp. all-purpose flour
12 oz. cream cheese, softened
2 eggs
1/4 cup milk
1/4 cup sour cream
1/2 tsp. vanilla extract
1/2 cup Nutella
Cool Whip topping

Directions

1. Mix together Oreos and butter. Press 1 Tbsp. of crust mixture into the bottom of 12 paper-lined muffin tins. Bake at 325 degrees for 5 minutes.  Allow to cool.
2. Blend together sugar, flour, and cream cheese until smooth.  Blend in eggs.  Add in milk, sour cream, and vanilla until combined.  Mix in Nutella.
3. Divide the mixture between the muffin tins, pouring about 1/4 cup of batter into each.  Bake at 325 for 20-24 minutes or until set.  Allow to cool and refrigerate.
4. Before serving, dollop whipped topping on each cheesecake and sprinkle with excess Oreo crumbs. 
My Notes: This was probably my favorite recipe of the four.  The original recipe recommends topping the cheesecakes with hazelnuts or shaved chocolate, which would also be delicious.  This recipe was found on the "Cooking Classy" blog.

Saturday, February 28, 2015

Bridal Shower Goodies, Part 1

I am always up for a good party - because good parties mean good food!  Last summer, my lovely cousin Courtney got married, and we had the honor of hosting a family bridal shower for her prior to the wedding.  Though the desserts were the main star of the show, we had some snack foods for a light meal, as well.  Since Courtney is a self-proclaimed frequent spill-er, we decided to choose foods that were especially hard on her - dips!  We served queso, Chalupa Dip, fresh veggies with Ranch dip, and Frozen Fruit Salad. Chalupa Dip is a layered dip that my mom often brings to our family Christmas for snacking, and the platter is almost always scraped clean.  Frozen Fruit Salad is also made for holidays occasionally, although the storage and transportation of the fruit cups is a bit more difficult.  Portioning the salad into individual plastic cups makes them easy for guests to pick up and carry - and it also prevents the problem of fruit salad juice running all over your plate.


Chalupa Dip

Ingredients

16 oz. can refried beans
9 oz. can bean dip
8 oz. sour cream
2 Tbsp. mayonnaise
3 Tbsp. Picante sauce
10 oz. cheddar cheese, shredded
1 tomato, diced
1 head lettuce, shredded
2 green onions, chopped
Tortilla chips for serving

Directions

1. Mix refried beans and bean dip; spread on large round serving platter.
2. Mix sour cream, mayo, and Picante sauce; spread over bean layer.
3. Sprinkle on half of grated cheese, followed by lettuce, onion, and tomatoes. Top with the remaining cheese.
My Notes: The platter that we usually use for this dip is about 15" diameter.  With all of the toppings, it is usually piled very high on the platter, so you may have to slightly press the lettuce into the sour cream layer for it adhere well.


Frozen Fruit Salad

Ingredients

3/4 cup (6 oz.) frozen lemonade concentrate
3/4 cup (6 oz.) frozen orange juice concentrate
15 oz. can crushed pineapple
2 1/4 cups water
3/4 cup granulated sugar
1 1/4 cup (10 oz.) frozen or fresh sliced strawberries
4 bananas, sliced

Directions

1. Mix all ingredients together in a large bowl.
2. Use a ladle to portion into individual serving containers.  Freeze.
3. Remove from freezer about 30 minutes before serving.
My Notes: We typically serve this in 6 oz. clear plastic cups.  However, if you have leftover salad after portioning into the cups you need or do not have freezer space for storing small cups, you can freeze it in a larger serving container and scoop out your own portions. This recipe makes about 12 servings.

Sunday, February 22, 2015

Go-To Dessert Bars

I remember the first time I made this bar recipe: I had convinced my mom that she should let me try a new recipe for the summer family reunion with her cousins and their families.  Of course, we have our classic dessert bar recipes, like Double Chocolate Crumble Bars and Peanut Logs, but I decided it was time to mix things up.  So, I headed on to one of my favorite sources for delicious recipes, the Taste of Home website, and ran across this recipe.  From reading my blog, you will quickly realize that I cannot resist any food that has peanut butter and chocolate in it, and these bars were no different.  They were a hit at the reunion, and my mom had to send out multiple e-mails the next day with the recipe.  We have made them countless times since and they never disappoint!


Peanut Butter Blondies

Ingredients

3/4 cup creamy peanut butter
2/3 cup butter, softened
1 cup packed brown sugar
1/2 cup granulated sugar
2 eggs
1 tsp. vanilla extract
1 3/4 cup flour
1 tsp. baking powder
1/3 cup milk
1 cup peanut butter chips
Frosting:
1/4 cup butter, softened
1/4 cup baking cocoa
2 Tbsp. milk
1 Tbsp. light corn syrup
1 tsp. vanilla extract
1 1/2 cups powdered sugar
1/3 cup peanut butter chips

Directions

1. Cream the peanut butter, butter, brown sugar, and granulated sugar until light and fluffy.  Beat in eggs and vanilla.
2. Combine flour and baking powder.  Add to creamed mixture alternately with milk, beating well after each addition.
3. Stir in peanut butter chips.
4. Spread into a greased 13"x9" baking pan. Bake at 325 degrees for 35-40 minutes or until a toothpick inserted near the center comes out clean. Cool on a wire rack.
5. For the frosting, combine the butter, baking cocoa, milk, corn syrup, and vanilla.
6. Gradually add the powdered sugar; beat until smooth.
7. Frost brownies.  Sprinkle with peanut butter chips. Cut into bars.
My Notes: I find that my bars are usually done in 25-30 minutes - make sure to check them earlier so that the edges do not get too dark. Also, I am usually generous with my peanut butter chips - both the amount I stir in and what I sprinkle on top.

Saturday, February 21, 2015

Mennonite Foods, Part 2

Verenike and New Year's Cookies are vital to any good Mennonite celebration, but there are a few other foods that are important to sample at the MCC Sale.  Cherry Moos is a sort of cherry pudding that can be eaten chilled or warm.  Bohnne Beroggi are simply sweet pockets of deliciousness - don't bother asking what is in them until you have tasted how good they are!  Finally, zwieback are a type of stacked roll that brings back many good memories for me.  My grandma and aunt prepared zwieback for nearly every family holiday gathering when I was growing up, and I began making them frequently myself in high school.  You can often tell who brought the zwieback to a church function based on their unique shape, size, and texture.  And, of course, everybody thinks their own recipe is best!


Cherry Moos

Ingredients

1 quart cherries & juice
3 cups water
1 cup granulated sugar
1/2 cup flour
1/4 tsp. salt
1 can evaporated milk
1/2 tsp. almond flavoring
red food coloring

Directions

1. Mix sugar, flour, and salt.  Stir in evaporated milk.  Set aside.
2. Combine cherries & water and bring to a boil.
3. Add a small amount of boiling cherry to evaporated milk mixture, then slowly add all back to the cherry mixture, stirring constantly.
4. Return to stove and heat until almost boiling.
5. Remove from heat and add almond flavoring and a few drops of food coloring.  Stir well.
6. Allow to cool, stirring occasionally.
My Notes: I usually prefer my cherry moos chilled, though I will not reject a warm bowl of it.  It can also be prepared as pluma moos using plums, but I have not ever tasted this flavor variety.

Bohne Beroggi

Ingredients

2 cups milk
1 cup cream
2 sticks butter
3/4 cup + 1 tsp. granulated sugar
1 cake yeast (= 2 1/4 tsp. active yeast)
1/4 cup lukewarm water
1 egg, beaten
9 cups flour
1 Tbsp. salt
Filling
2 cups cooked pinto beans, liquid drained off & mashed
2/3 cups granulated sugar
1/2 tsp. salt
1/4 cup cream
Sauce
1 quart half-and-half
1 cup granulated sugar
3 Tbsp. cornstarch
1 Tbsp. milk

Directions

1. Scald milk & cream.  Add butter and 3/4 cup sugar; cool to lukewarm.
2. Dissolve yeast in lukewarm water; add 1 tsp. sugar. Add to milk mixture.
3. Add egg, flour, and salt to yeast-milk mixture. Mix well. Knead.
4. Let rise until double in bulk. Punch down. Let rise again until double.
5. Form into small buns the size of a walnut or larger, if desired.  Let rise and flatten with hand.
6. Combine all filling ingredients; mix well.
7. Place a heaping teaspoon of filling in the center of each bun.  Seal edges.
8. Place on a greased pan and let rise until double in bulk, about 1 hour.  Bake at 350 degrees for about 20-25 minutes or until browned.
9. For the sauce, dissolve the cornstarch in milk.  Combine with the sugar and half-and-half in a saucepan; simmer.
10. Whisk until thick.  Pour sauce over buns.
My Notes: This recipe comes from myslys on food.com.  She also states that the buns can be placed in the crockpot and sauce can then be poured over top to keep them warm.

Zwieback

Ingredients

3 cups milk
1 cup vegetable oil
2 Tbsp. salt
6 Tbsp. granulated sugar
1/2 cup water
5 tsp. yeast
9-11 cups flour

Directions

1. Proof yeast in water.
2. Scald milk.  Add oil, salt, sugar, yeast, and flour.
3. Let rise about 1 hour.  Knead.  Let rise another hour.
4. Shape by stacking large and small balls of dough. Let rise 1 hour on pans.
5. Bake at 350 degrees for 12-15 minutes.
My Notes: I "scald" the milk in the microwave - I don't know if that's a necessary step, but it is at least warm when I add the yeast mixture.  I usually end up using about 10 cups of flour, depending on the stickiness of the dough that day.  The bottom parts of the zwieback are usually about 3" balls, while the toppers are about 1" rolls - the size I make them often depends on  what occasion I am making them for and how far I am trying to stretch the recipe. (This recipe typically makes a little more than 4 dozen) I haven't really mastered the shaping, as I still sometimes have a few of the tops roll of during baking, but I'm getting better!  I usually bake them for about 12 minutes.

Friday, February 20, 2015

Mennonite Foods, Part 1

         Since I am posting my food photos in order, it's time for a brief interlude from foods that I have cooked in my cozy apartment.  That's right - it's Kansas Mennonite Central Committee Sale time!!  These photos were from the 2014 MCC Sale.This is one of the only times of the year that I get these traditional Mennonite foods - so you can bet that I prepare my stomach to indulge days in advance.  I have not actually made most of the Mennonite food recipes at home, but my family does usually fry up a batch of New Year's Cookies each New Year's Day.  I do have the recipes, though, so making verenike is definitely on my "someday" cooking list (when I can find somewhere that sells dry curd cottage cheese...).  Feel free to beat me to it!


New Year's Cookies

Ingredients

2 1/4 tsp. yeast
1/4 cup warm water
3 cups raisins, soaked & drained
7 cups flour
5 eggs, beaten
3/4 cup granulated sugar
3 Tbsp. butter, melted
2 1/2 cups warm milk
2 tsp. baking powder
2 1/2 tsp. salt
Vegetable oil for frying

Directions

1. Dissolve yeast in warm water and set aside.
2. Mix together 2 cups flour, eggs, sugar, butter, milk, baking powder, and salt.  
3. Mix in yeast mixture.
4. Combine raisins with 1 cup flour.  Stir into batter mixture.
5. Add 4 additional cups of flour.
6. Cover and let rise for 1 hour.  
7. Heat vegetable oil in pan or deep fat fryer.  Use cookie scoop to dip batter.  Deep fat fry cookies until browned.
8. Drizzle with glaze, roll in granulated sugar, or dust with powdered sugar.

Glaze Recipe:

Mix 1 1/4 cups powdered sugar with 3 Tbsp. of milk.  Add more milk as needed to reach desired consistency.  
My Notes: These are so addictive-ly delicious, especially if they are eaten hot and fresh! More than one recipe of glaze will be necessary to coat a whole recipe of New Years' Cookies. This version of the recipe is from my church's 200th anniversary cookbook.  

Verenike

Ingredients

2 1/2 cups dry-curd cottage cheese
1/4 tsp. ground black pepper
4 eggs
3 3/4 cups flour
1/3 cup nonfat dry milk powder
3/4 tsp. baking powder
1/2 tsp. salt
3/4 cup water
4 tsp. vegetable oil
Gravy
3 Tbsp. butter
1 cup cubed ham
3 Tbsp. all-purpose flour
1/2 tsp. salt
1/8 tsp. ground black pepper
2 1/2 cups warm millk

Directions

1. Blend cottage cheese, black pepper, and 2 eggs until smooth.  Set aside.
2. In a large bowl, stir together flour, milk powder, baking powder, and 1/2 tsp. salt.
3. Beat together remaining 2 eggs, water, and vegetable oil.  Combine with flour mixture.
4. On a floured surface, knead dough about 10 times.  Divide dough in half and roll each portion to 1/8" thickness.
5. Cut out rounds with a 4" round cutter.  
6. Place 1 Tbsp. of the cottage cheese filling at the center of each circle.  Moisten the edge and fold it over to form a half-moon shape.  Pinch to seal.
7. Bring a large pot of water to boil.  Add half of the verenike and cook 8-10 minutes or until tender.  Remove with a slotted spoon and drain.  Repeat with the other verenike.
8. For the gravy, melt the butter in a skillet over medium-low heat.  Stir in the ham and cook until browned.
9. Add the flour, salt, and black pepper.  Stir.
10. Pour in the milk all at once, whisking constantly. Cook and stir until thick and bubbly.  Serve over the verenike.
My Notes: This version of the recipe came from myslys' post on food.com.  The more gravy (and the more ham in the gravy), the better - so adjust the recipe as necessary to satisfy your tastes.  A trick for cooking the verenike is that they should begin to float when they are cooked through.

Thursday, February 19, 2015

Throwback Thursday

           I moved into an apartment with a friend for my junior and senior years of college.  Though the new-found independence is exciting, what I really love is grocery shopping and cooking for myself!  I have documented some of my cooking accomplishments on my iPhone (my first smart phone that I got for Christmas my junior year - LIFE-CHANGING!!).  Instead of just having an album full of delicious-looking foods, I decided I should go a step further and actually record what the recipes are that I have made.  It's going to take me awhile to catch up for the last year and a half, but hey - delicious food never goes out of style (which brings one of my favorite Taylor Swift songs to mind...)!
        So, first up are some delicious treats I made for last year's Super Bowl party (2/1/2014).  On the right are Patterned Cheesecake Squares from the  Taste of Home website.  On the left is Lovin' Peanuts Chex Mix (party mixes are always a personal weakness of mine!).  Finally, the container in the back holds Southwest Chicken Wrap filling (which wasn't actually for the Super Bowl party, but still made the picture...); this recipe  is one that my mom makes frequently out of our church's cookbook. 


Patterned Cheesecake Squares

Ingredients

1 tube (16.5 oz.) refrigerated peanut butter cookie dough
1 package (8 oz.) cream cheese, softened
1/4 cup granulated sugar
1 cup (8 oz.) sour cream
1 egg
1/2 teaspoon vanilla extract
1 1/4 cups chocolate ice cream topping, divided

Directions

1. Cut cookie dough into 24 slices.  Arrange side-by-side in a 13" x 9" baking pan; press together to close gaps.  Bake at 350 degrees for 12-14 minutes or until lightly browned.
2. Meanwhile, in a large bowl, beat cream cheese and sugar until smooth.  Beat in the sour cream, egg, and vanilla; mix well.  Spread 3/4 cup chocolate topping over warm crust.  Carefully spread cream cheese mixture evenly over topping.
3. Bake for 30-35 minutes or until a toothpick inserted near the center comes out clean.  Cool on a wire rack.  Cut into bars.
4. Optional: Place remaining chocolate topping in a heavy-duty releasable plastic bag; cut a small hole in a corner of a bag.  Pipe patterns on bars.  Refrigerate until serving.
Yield: 2 dozen
My Notes: I only had to bake the cookie dough crust for 10 minutes.  I used a little bit more than 1/4 cup of sugar.  I used milk chocolate ice cream topping (more similar to hot fudge than chocolate syrup).  I drizzled the chocolate over the whole cheesecake instead of making patterns.

Lovin' Peanuts Chex Mix

Ingredients

2 cups Corn Chex cereal
2 cups Honey Nut Chex cereal
2 cups Chocolate Chex cereal
1 cup honey-roasted or dry-roasted peanuts
1/4 cup margarine or butter
1/4 cup packed brown sugar
1/4 cup peanut butter
1/4 cup peanut butter chips

Directions

1. In a large microwaveable bowl, mix cereals and peanuts.
2. Microwave butter until melted, about 30 seconds. Stir in peanut butter and brown sugar.  Microwave about 30 seconds or until boiling.  Pour over cereal.
3. Microwave on high 3 to 4 minutes, stirring every minute, until browned.  Spread on a wax paper or foil-lined baking sheet.
4. Microwave peanut butter chips in small microwaveable bowl 40-50 seconds or until they can be stirred smooth.   Pour into small zip-type bag, snip a tiny corner, and drizzle over top.
My Notes: I used 3 cups of Honey Nut Chex & 3 cups of Chocolate Chex instead of buying Corn Chex (I mean, how many boxes of Chex does a person really need to have around?). I cut the hole in the corner of my bag a bit large, so the drizzling didn't go very well - cut a very tiny hole!


Southwest Chicken Wraps

Ingredients

1 cup sour cream
1 cup salsa (Picante sauce)
2 Tbsp. mayonnaise or Miracle Whip
2 10-12 oz. cans chicken breast, drained & shredded
2 cups shredded cheddar cheese
Flour tortillas for serving

Directions

1. Combine sour cream, salsa, and mayonnaise in a large bowl. Stir in chicken and cheese.
2. Serve cold on tortillas with additional toppings and salsa, if desired.
My Notes: This is one of my favorite meals ever!! I typically use colby jack cheese because that's what I keep on hand, but I'm sure it would be delicious with any kind of cheese.